Use this guide to set up an electric roasting pan, roast food in it, and confirm the food is safely cooked. It is for beginners using a countertop electric roaster for the first time or returning to one after storage. Allow 15-30 minutes for setup and preheating; cooking time depends on the recipe and the size of the food.

Get home appliances delivered free with Prime
- Fast, free delivery on millions of items
- Prime Video, Amazon Music and more included
- Member-only deals all year

28-Quart Electric Roaster Oven with Self-Basting Lid
- ✔ Capacity: 28 quarts
- ✔ Temperature range: 150–450°F
- ✔ Wattage: 1450 watts

Sunvivi 28-Quart Electric Roaster Oven with Removable Pan, Self-Basting Lid, and Thaw and Warming Settings
- ✔ Capacity: 28 quarts
- ✔ Maximum turkey size: Up to 30 pounds
- ✔ Temperature range: 150–450°F
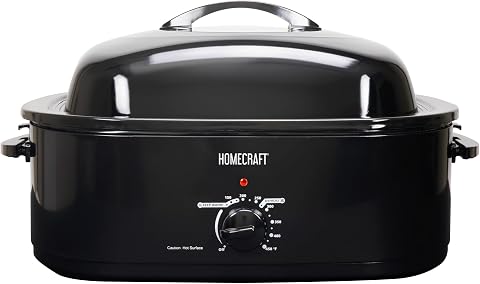
Homecraft 18-Quart Electric Roaster Oven with Removable Enamel Pot
- ✔ Capacity: 18 quarts
- ✔ Maximum temperature: 450°F
- ✔ Temperature control: Full-range dial; three listed settings
Difficulty: Beginner | Time: 15-30 minutes of setup, plus cooking time
What You’ll Need
Tools & Materials:
- Electric roasting pan with lid and removable cooking insert
- Stable, heat-resistant counter or table
- Food-safe thermometer
- Oven mitts
- Tongs or other suitable serving utensils
- Dish soap, sponge, and clean towels
Knowledge:
- Basic kitchen food-safety practices
- How to read the appliance’s temperature and care instructions
Read the manufacturer’s instructions before use. Roasters vary in capacity, temperature controls, and whether they require water in the base. Follow the manual and your recipe whenever their directions differ from general guidance. Thaw food safely in the refrigerator before roasting; do not use the roaster to thaw frozen meat.
28-Quart Electric Roaster Oven with Self-Basting Lid
For cooks who want one electric roaster to cover several jobs, the 28-Quart Electric Roaster Oven earns our Best Overall role through its combination of capacity and control. Its 150–450°F range gives us more detail than a small set of preset levels, while the defrost and warm functions help it bridge preparation and serving. It can roast, bake, and slow cook, so the large footprint has a purpose beyond holiday turkey duty.The self-basting visible lid is useful in two ways: it circulates moisture and heat, and lets us check progress without lifting the lid as often. That matters when maintaining cooking conditions is part of the job. Like the SUNVIVI, this model has a 28-quart capacity and removable pan and rack; the SUNVIVI, however, provides a specific maximum turkey size of 30 pounds, which this listing does not. We would choose this one for broader temperature flexibility, not because the available information establishes a larger bird capacity.Its tradeoff is physical: the listed dimensions are 27 inches deep, 22 inches wide, and 23 inches high, so we would measure the counter and storage spot before buying. The product description also does not say whether the removable components are dishwasher-safe. Compared with the 18-quart Homecraft, it gives us more room and more explicit temperature control, but the Homecraft is shorter and easier to consider where space is limited.
Pros:
- 28-quart capacity suits large meals.
- 150–450°F adjustable temperature control.
- Defrost and warm functions add preparation and serving flexibility.
- Visible self-basting lid and removable pan and rack.
Cons:
- Listed dimensions require substantial counter and storage space.
- Dishwasher safety is not specified for the removable components.
- No maximum turkey size is given in the description.
Best for: Cooks who need a large-capacity roaster with a broad stated temperature range, defrost and warming functions, and several cooking uses.
Not ideal for: Buyers with limited counter or storage space, or anyone who requires confirmed dishwasher-safe parts or a specified maximum turkey size.
Bottom line: We recommend this as the most flexible all-around choice when its large footprint fits your kitchen.
“We recommend this as the most flexible all-around choice when its large footprint fits your kitchen.”
Sunvivi 28-Quart Electric Roaster Oven with Removable Pan, Self-Basting Lid, and Thaw and Warming Settings
The SUNVIVI 28-quart roaster is the clearest pick for buyers who plan around a substantial turkey: its description says it fits a bird up to 30 pounds. That concrete capacity detail gives it an edge over the first 28-quart model, whose listing does not specify a maximum bird size. It also offers roast, bake, and slow-cooking use, with thawing and warming settings for moving from preparation through serving.Its core setup resembles our Best Overall pick: both have 1450 watts, a 150–450°F temperature range, a self-basting lid, and removable cooking components. The difference is the SUNVIVI’s more explicit large-bird guidance and handling details, including cool-touch handles and non-skid feet. Those features are useful when positioning a heavy appliance or moving around it during cooking. The available description lists dimensions of 23.45 × 15.4 × 15.6 inches, smaller than the first model’s stated dimensions, though buyers should confirm their available space against the specific product measurements.The main caution is the clear liner’s use instruction: it should be used below 350°F and with water to prevent sticking. That is a meaningful limitation for a roaster whose temperature control reaches 450°F, so we would follow the liner guidance closely and consider how often we cook above that threshold. Compared with the Homecraft, SUNVIVI offers ten more quarts and a stated turkey capacity, but it takes on the storage demands of a large roaster and has a liner condition to keep in mind.
Pros:
- Stated capacity fits a turkey up to 30 pounds.
- 150–450°F control plus thawing and warming settings.
- Self-basting lid and removable pan support cooking and cleanup.
- Cool-touch handles and non-skid feet support practical handling.
Cons:
- Clear liner should be used below 350°F and with water to prevent sticking.
- 28-quart size may be excessive for smaller households or storage areas.
- Dishwasher-care details are not provided.
Best for: Hosts who want a 28-quart electric roaster and value an explicitly stated fit for a turkey up to 30 pounds.
Not ideal for: Buyers who want an unrestricted liner at higher temperatures, or who prefer a compact appliance for occasional small meals.
Bottom line: We would choose SUNVIVI when a stated 30-pound turkey capacity matters more than avoiding liner-use conditions.
“We would choose SUNVIVI when a stated 30-pound turkey capacity matters more than avoiding liner-use conditions.”
Homecraft 18-Quart Electric Roaster Oven with Removable Enamel Pot
When 28 quarts feels like more appliance than the kitchen needs, the Homecraft 18-quart roaster offers a smaller-capacity route to roasting and family meals. It can handle turkey, chicken, roasts, vegetables, and other dishes, while its removable enamel pot and stainless-steel lift-out rack make it easier to remove food and clean around the cooking vessel. Relative to the two 28-quart choices, its capacity is more restrained, which can help buyers avoid storing a larger unit than they regularly use.Homecraft still reaches 450°F, matching the top end of the two larger models, and its high-dome lid accommodates taller foods. Cool-touch handles are another practical detail when lifting the lid or handling the pot. But the controls are described as having three settings, so buyers who want fine adjustment should look to the first 28-quart model, which specifies a 150–450°F range. The listing also mentions thawing, roasting, slow cooking, and keeping food warm, though the control description gives less detail about how precisely those modes can be set.This is the right role for a buyer who wants a capable electric roaster without stepping up to 28 quarts. It is not truly small: the 18-quart capacity and 23.43-inch depth still call for a storage plan. Compared with SUNVIVI, it has less room and no stated maximum turkey size, but the enamel pot and shorter listed height may be preferable for some kitchens. We would skip it if large birds or precise temperature adjustments are the main priorities.
Pros:
- 18-quart capacity is less than the two 28-quart models.
- Removable enamel pot and lift-out rack simplify food handling.
- High-dome lid and cool-touch handles support practical use.
- Temperature reaches 450°F.
Cons:
- Three listed settings may limit fine temperature adjustment.
- Still requires storage space despite its smaller capacity.
- No maximum turkey size or dishwasher-care details are specified.
Best for: Households that want an electric roaster for family meals and occasional larger dishes but do not need 28-quart capacity.
Not ideal for: Buyers who regularly cook very large turkeys or need clearly specified, fine-grained temperature adjustment.
Bottom line: We recommend Homecraft for buyers who want useful roaster capacity with a smaller load of space than a 28-quart model demands.
“We recommend Homecraft for buyers who want useful roaster capacity with a smaller load of space than a 28-quart model demands.”
As an Amazon Associate we earn from qualifying purchases.
Before You Start
Place the roaster on a level, dry surface with open space around it. Keep it away from the sink, hanging items, and surfaces that can be damaged by heat. Check that the cord and appliance are undamaged, and keep the cord clear of walkways. Never immerse the heating base or temperature control in water. Wash the removable insert and lid if needed, then dry them before assembly.
Use a recipe written for an electric roaster or follow the appliance manual for cooking guidance. A countertop roaster may cook differently from a conventional oven, so do not assume the same time or temperature will produce the same result. Use a food thermometer to check doneness.
Step-by-Step Instructions
Step 1: Set up the roaster
Set the clean cooking insert into the heating base. Add water only if the manual or your recipe calls for it, and do not fill the base beyond its marked limit. Keep the outside and underside of the insert dry before placing it in the base. Fit the lid on top.
Tip: The heating base is not a cooking vessel. Put food in the removable insert, never directly on the base.
Check: The insert sits level in the base, the lid fits, and the power cord is undamaged and positioned away from heat and foot traffic.
Step 2: Preheat the roaster
Plug the roaster directly into a suitable outlet and set it to the temperature specified by the recipe or manual. Preheat it with the lid on for the time the manufacturer recommends. If the manual gives no preheating time, follow the recipe’s directions and allow the unit to heat before adding food.
Tip: The exterior and lid can become hot. Keep children and pets away, and use oven mitts when handling hot parts.
Check: The roaster has reached the recipe’s starting temperature or completed the preheat period given in its manual.
Step 3: Prepare and place the food
Season and prepare the food according to your recipe. Place it in the preheated insert, using a rack if the recipe or manual calls for one. Arrange pieces with space around them so heat can circulate, and keep food below the insert’s fill line. Put the lid on securely.
Tip: Use separate utensils and plates for raw and cooked meat. Do not put cooked food back on a plate that held it raw unless the plate has been washed.
Check: The food is inside the insert, below its fill limit, and the lid closes without pressing against the food.
Step 4: Set the cooking temperature
Set the temperature recommended by your recipe or appliance manual. If the recipe specifies an oven temperature, check whether it includes electric-roaster instructions before using that setting. Keep the lid closed while cooking; lifting it releases heat and can extend the cooking time.
Tip: Do not leave the roaster unattended for extended periods. Follow the manual’s directions for safe operation and supervision.
Check: The temperature control is set as directed, and the lid remains in place during the cooking period.
Step 5: Check cooking progress and doneness
Check the recipe’s suggested time, then use oven mitts to lift the lid away from your face because hot steam may escape. Insert a food-safe thermometer into the thickest part of the food without touching bone. Check multiple spots for large roasts or poultry, and cook until the food reaches a safe temperature for its type.
Tip: Use current food-safety temperature guidance for the specific food. Color and clear juices alone do not reliably confirm that meat is safe to eat.
Check: The thermometer reading meets the safe temperature recommended for the food, and any recipe-specific texture checks are satisfied.
Step 6: Remove and rest the food
Turn the temperature control off and unplug the roaster when cooking is complete. Use oven mitts and suitable utensils to remove the food from the hot insert. Rest it for the time your recipe recommends before carving or serving.
Tip: Set the hot lid and insert on a heat-resistant surface. Do not place them on a damp counter or near the edge of a table.
Check: The food has been removed safely, and the roaster is switched off and unplugged.
Step 7: Cool and clean the roaster
Let the appliance cool before cleaning. Remove the insert and lid, then wash them according to the manual, using warm soapy water if they are dishwasher-safe or hand-washing is required. Wipe the heating base with a damp cloth only; keep water away from electrical parts and never immerse the base or control. Dry all parts before storing.
Tip: Do not pour cold water into a hot insert. A sudden temperature change can damage it.
Check: The insert and lid are clean and dry, and the heating base has been wiped without soaking electrical components.
Common Mistakes to Avoid
- Adding water to the base even though the model does not call for it. — Check the manual and recipe first. Add water only as directed, and keep it out of the heating base’s electrical components.
- Opening the lid repeatedly to check the food. — Use the recipe’s timing as a guide, keep the lid closed during most of cooking, and check doneness with a thermometer near the expected finish.
- Filling the insert too full or packing food tightly. — Stay below the fill line and leave room for the lid to close and heat to circulate around the food.
- Relying on cooking time or appearance instead of measuring temperature. — Check the thickest part of the food with a food-safe thermometer and follow safe temperature guidance for that food.
Troubleshooting
Problem: The roaster does not heat.
Solution: Turn the control off, check that the plug is fully inserted and the outlet works, then consult the manual for reset or setup instructions. Stop using the appliance if the cord, plug, or base appears damaged.
Problem: The food is cooking more slowly than the recipe suggests.
Solution: Keep the lid closed, confirm the control is set correctly, and check the food’s internal temperature rather than relying only on elapsed time. Allow extra cooking time and verify doneness before serving.
Problem: The top is browning too quickly.
Solution: Check the manual and recipe for options such as reducing the temperature or covering the food as directed. Keep the lid properly fitted and monitor the internal temperature so the center finishes safely.
Problem: The insert or food is sticking.
Solution: Follow the recipe’s directions for oiling or using a rack, and avoid scraping the insert with metal tools if its surface is nonstick. Let stuck-on residue soften in warm soapy water after the insert cools.
What Success Looks Like
The food is cooked to a safe internal temperature, served after any recommended resting period, and has the texture expected by the recipe. The roaster is switched off and unplugged, the insert and lid are clean and dry, and the heating base remains dry.
Next Steps
Store the roaster only after all parts have cooled and dried. Keep the manual with the appliance so you can check its temperature, water, and cleaning requirements next time. For another meal, choose a recipe that fits the insert’s capacity and check the food with a thermometer before serving.
Frequently Asked Questions
Can I use an electric roasting pan like a regular oven?
Use it as its own countertop appliance and follow its manual. Cooking times and heat distribution may differ from a conventional oven, so use recipe guidance intended for an electric roaster when available and check food temperature.
Do I need to put water in the roaster?
Only if the appliance manual or your recipe instructs you to. Models differ, and unnecessary water can affect cooking or appliance operation.
Can I cook frozen meat in an electric roasting pan?
Thaw meat safely in the refrigerator before roasting unless the appliance and a tested recipe specifically give instructions for cooking that food from frozen. A frozen center can remain undercooked while the outside heats.
How do I know when a roast is done?
Measure the internal temperature with a food-safe thermometer in the thickest part, avoiding bone. Follow safe temperature guidance for the type of roast and the recipe’s recommended resting time.
Can I wash the whole electric roaster in the sink?
No. Remove and wash the insert and lid as directed by the manual. Wipe the heating base with a damp cloth and keep water away from the controls, cord connection, and other electrical parts.