Professional bakers use specialized proofing chambers or boxes with precise temperature and humidity controls, often connected to smartphone apps for monitoring. They rely on environment-controlled spaces like proofing rooms or chambers to make certain of consistent results. At home, you can mimic this by using household items such as damp towels, shallow water trays, or plastic containers with lids, along with thermometers or smart sensors. Keep exploring to discover more tips on creating the perfect proofing environment at home.
Key Takeaways
- Use dedicated proofing chambers or controlled environments with precise temperature (75-80°F) and humidity for consistent results.
- Incorporate tools like proofing boxes, damp towels, water trays, or humidifiers to maintain optimal moisture levels at home.
- Monitor temperature and humidity regularly with thermometers and hygrometers, adjusting conditions as needed.
- Utilize smart sensors or DIY techniques such as plastic wrap or damp cloths to create stable proofing environments.
- Replicate professional setups by controlling environment variables, ensuring reliable proofing similar to commercial equipment.

Philips 7000 Series Pasta Maker, ProExtrude Technology 150W, 8 discs, Perfect Mixing Technology, Prepare up to 8 Portions, HomeID App, White, (HR2660/03)
PASTA UNDER 10 MINUTES: Enjoy fresh homemade pasta effortlessly in under 10 minutes¹.
As an affiliate, we earn on qualifying purchases.
Why Proper Proofing Conditions Are Critical for Perfect Bread and Pastries
Proper proofing conditions are essential because they directly influence how well your bread and pastries rise and develop their texture. Understanding fermentation science helps you control temperature and humidity, which are key to ideal dough behavior. When conditions are just right, yeast activity is steady, producing the gases that give your baked goods their lightness and structure. If the environment is too cold, fermentation slows, resulting in dense, flat bread. Too warm, and the dough may overproof, collapsing or developing off-flavors. Precise proofing conditions ensure consistent fermentation, allowing the dough to mature properly. By mastering these factors, you help your dough behave predictably, leading to better rise, improved crumb structure, and a more satisfying final product. Proper proofing truly makes all the difference. Additionally, utilizing energy-efficient cloud servers can support your baking business by streamlining operations and reducing environmental impact. Controlling proofing conditions through proper equipment setup is a crucial step in achieving bakery-quality results at home. Properly monitoring temperature and humidity with reliable tools ensures your proofing environment remains optimal, and employing smart proofing chambers can help automate this process for consistent results. Regularly checking your proofing environment with accurate instruments can prevent common issues like overproofing or underproofing, ensuring your baked goods turn out just right.

VEVOR Electric Pasta Maker, 150W Automatic Noodle Maker Machine with 8 Pasta Shapes, 4 Intelligent Modes, 500g Flour Capacity Pasta Maker Machine with Measuring Cups, Cleaning Brush for Home Kitchen
User-Friendly Operation: Designed for ease of use, this pasta maker machine comes with recipes and simple ratios to...
As an affiliate, we earn on qualifying purchases.
What Do Professional Bakers Use for Proofing? Equipment and Setups Explained
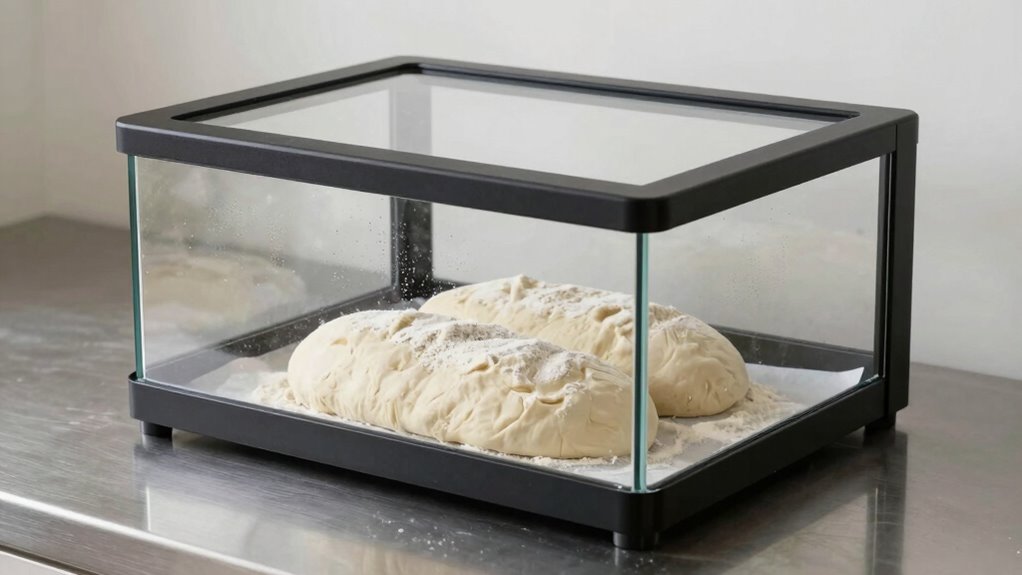
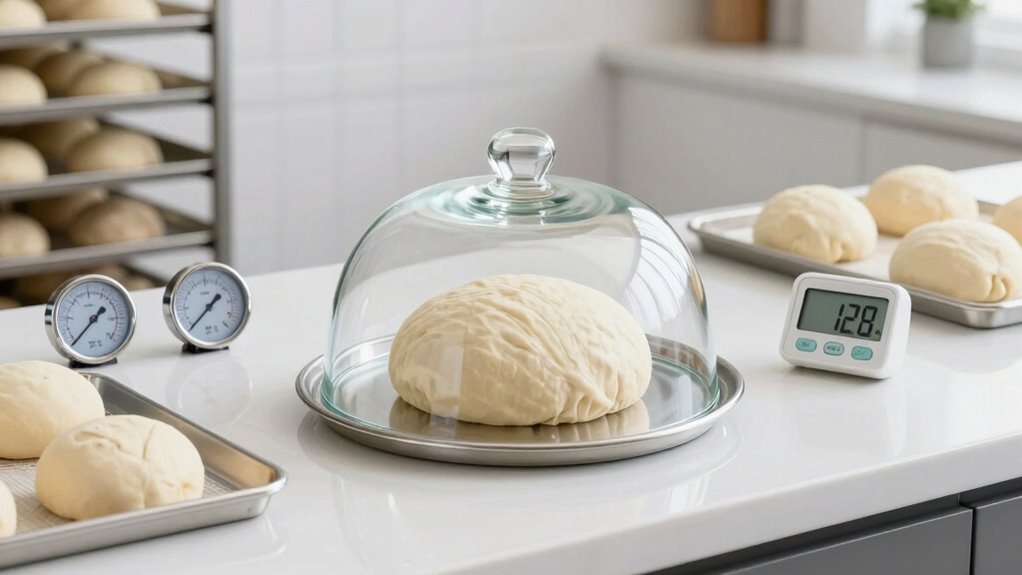
Professional bakers rely on specialized equipment and setups to create ideal proofing environments, guaranteeing consistent results. Proofing equipment like proofing boxes, fermentation cabinets, and proofing baskets help maintain perfect temperature and humidity levels, essential for proper dough fermentation. Professional setups often include temperature-controlled proofing chambers or dedicated proofing rooms, which provide stable conditions regardless of external changes. These tools allow bakers to fine-tune the environment for different dough types, leading to better rise, texture, and flavor. Using high-quality proofing equipment ensures reliability and efficiency, especially during busy production schedules. Additionally, modern connected appliances enable precise monitoring and control of proofing conditions via smartphone apps, making professional-level proofing more accessible at home. Understanding climate control systems and their role in maintaining optimal proofing environments helps home bakers achieve more consistent results. Incorporating environmental monitoring tools can further enhance the accuracy of proofing conditions and improve baking outcomes. Moreover, some advanced proofing chambers feature integrated humidity controls and programmable settings, allowing for even more precise environment management. While home setups might not match the sophistication of professional setups, understanding these tools helps you appreciate the importance of environment control for perfect proofing.
Philips Kitchen Appliances Compact Pasta and Noodle Maker, Viva Collection, Comes with 3 Default Classic Pasta Shaping Discs, Fully Automatic, Recipe Book, Small, White (HR2370/05)
Automatically kneads and extrudes 2-3 servings of fresh pasta in just 18 minutes thanks to uniquely designed stirring...
As an affiliate, we earn on qualifying purchases.
How Can I Create a Warm, Humid Proofing Environment at Home? Simple DIY Tips
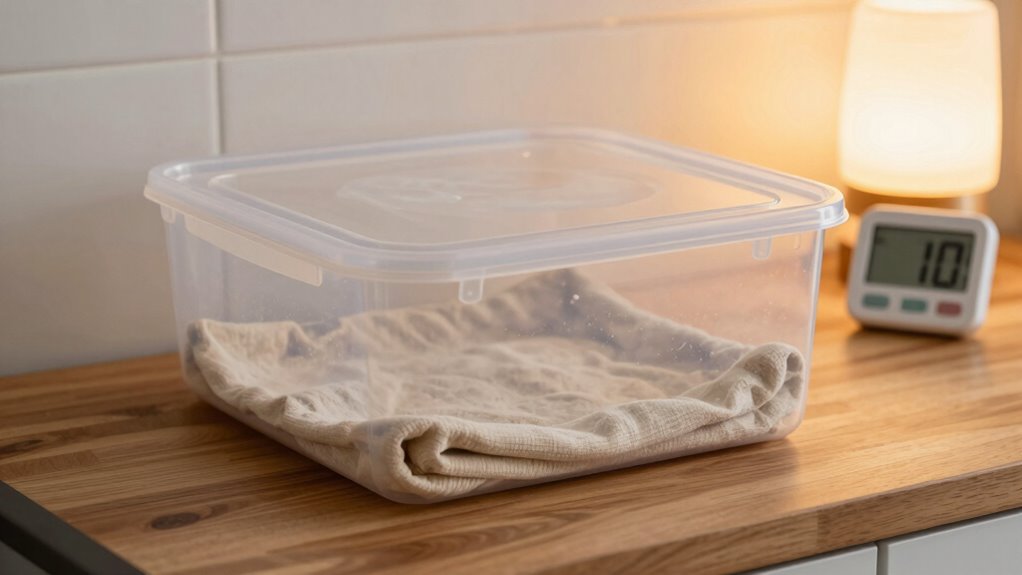
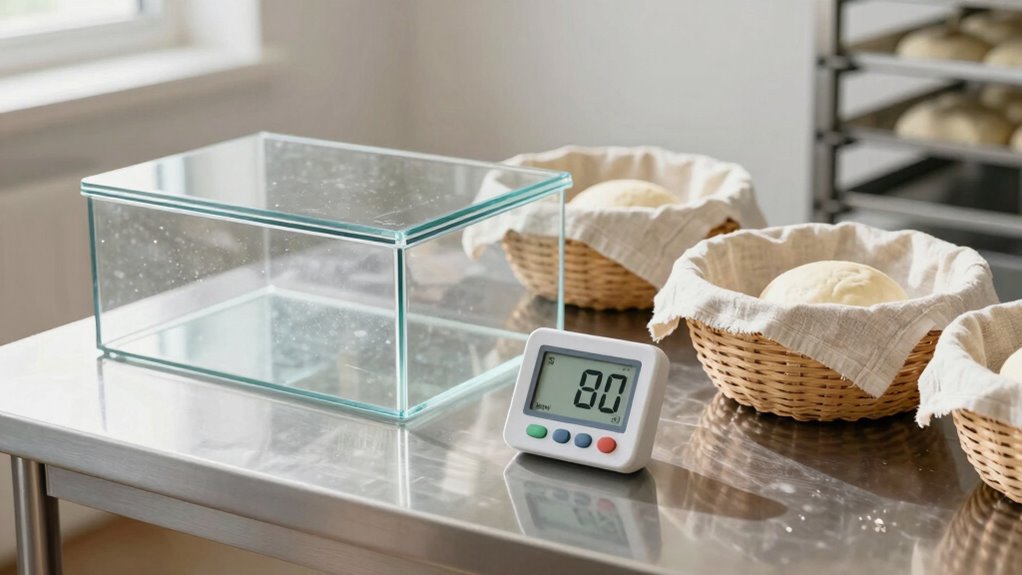
Creating a warm, humid environment at home doesn’t require expensive equipment. You can craft a simple proofing chamber or fermentation box using household items. The key is maintaining consistent warmth and humidity for ideal dough rise.
- Use a plastic storage container with a lid as a DIY proofing chamber, adding a damp towel inside for humidity.
- Place a small bowl of water in the box, ensuring it stays warm, to create a humid environment.
- Cover your dough and the container with plastic wrap or a damp cloth to trap moisture and heat. Proper sealing techniques can help improve humidity retention.
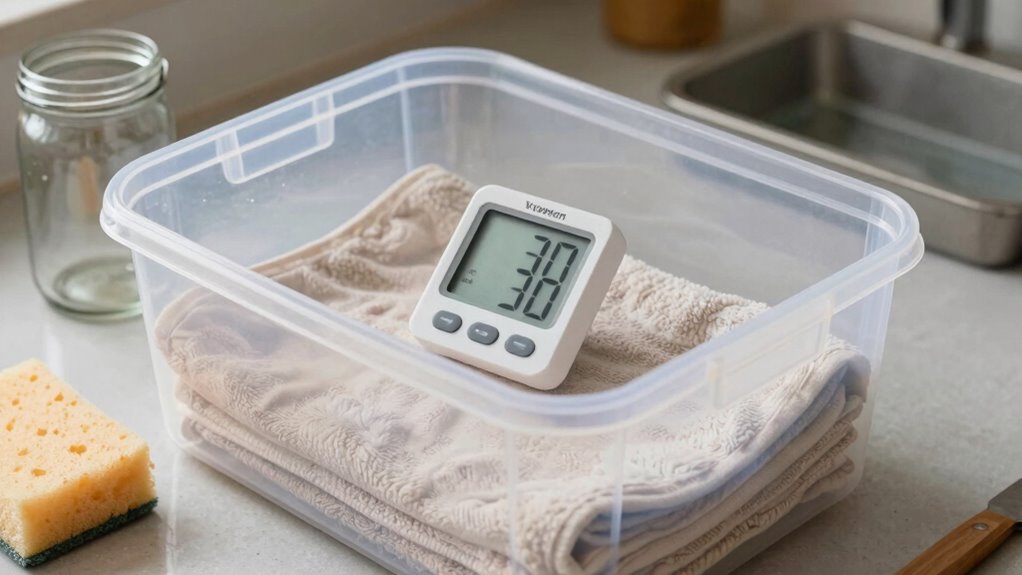
- Monitoring temperature and humidity levels with a simple thermometer helps ensure your projector environment remains optimal for your setup.
- Incorporating smart home technology such as temperature and humidity sensors can help you maintain precise conditions effortlessly.
- Consistent monitoring and adjusting your setup based on climate control principles can further improve your proofing environment.
These tips help mimic professional proofing setups, offering a controlled environment for fermentation. With these simple DIY solutions, you’ll achieve perfect proofing conditions right in your kitchen.

VEVOR Electric Pasta Maker, 150W Automatic Noodle Maker Machine with 8 Pasta Shapes, 4 Intelligent Modes, 500g Flour Capacity Pasta Maker Machine with Measuring Cups, Cleaning Brush for Home Kitchen
User-Friendly Operation: Designed for ease of use, this pasta maker machine comes with recipes and simple ratios to...
As an affiliate, we earn on qualifying purchases.
How to Control Temperature and Humidity Using Household Items
Controlling temperature and humidity at home is easier than you might think with everyday household items. To encourage yeast fermentation and improve dough elasticity, maintain a consistent environment. Use a bowl of hot water inside your proofing box or covered container to raise humidity naturally. Placing a thermometer in your proofing area helps monitor temperature, which should stay around 75-80°F for best yeast activity. If it’s too warm, add a damp towel nearby to lower the temperature slightly; if too cold, place the container closer to a warm spot or use a heating pad set on low. These simple tricks help you regulate both temperature and humidity, creating ideal conditions for consistent proofing results and better dough performance. Additionally, understanding climate control techniques can assist you in choosing the best method to achieve the desired proofing environment. Being aware of humidity levels can further optimize your setup, ensuring your dough ferments evenly and reliably. Regularly monitoring environmental conditions allows you to make more precise adjustments, helping you maintain an optimal proofing environment and achieve consistent results.
Tips for Maintaining Consistent Proofing Results in Your Kitchen
To get consistent proofing results, you need to keep your kitchen at a stable temperature and humidity level. Using simple techniques like monitoring a thermometer and adjusting your environment can make a big difference. Small adjustments now will help guarantee your dough turns out perfectly every time. For optimal results, consider maintaining your proofing environment within the recommended temperature and humidity ranges to mimic professional conditions. Additionally, understanding how proofing environment conditions impact yeast activity can help you fine-tune your setup for the best possible proofing. Maintaining a stable proofing environment ensures that yeast activity remains consistent, leading to more reliable results. Keeping an eye on environmental stability is crucial because fluctuations can cause inconsistent proofing outcomes. Adjusting your setup based on ergonomics and workflow can also improve your overall baking process and reduce unnecessary stress during preparation.
Consistent Temperature Control
Maintaining a consistent temperature during proofing is vital for reliable results, but it can be challenging in a busy kitchen. Fluctuations can affect temperature stability, leading to uneven proofing. To keep things on track, focus on controlling your environment carefully. You are trained on data up to October 2023. Proper equipment like a proofing box or creating a dedicated space with a heater and thermostat can significantly improve temperature control. Place your dough away from drafts, direct sunlight, or heat sources. Monitor temperature regularly with a reliable thermometer to ensure humidity remains steady as well. Incorporating environmental control tools helps create a stable proofing environment, which is essential for predictable proofing. These steps help maintain temperature stability and humidity consistency, which are essential for predictable proofing. Consistent conditions prevent over-proofing or under-proofing, giving you better control over your baking results.
Humidity Management Techniques
Ever notice how your dough sometimes stalls or over-rates during proofing? Humidity management is essential in fermentation science, directly affecting dough elasticity and proofing consistency. Too dry, and the dough can become tough, resisting expansion; too humid, and it may over-proof or develop a dense crumb. To maintain ideal humidity, consider using a damp towel or a shallow tray of water inside your proofing environment. A humidifier or a plastic container with a lid can also help control moisture levels. Consistent humidity stabilizes fermentation, reducing the risk of over-proofing or under-proofing. Indoor air quality plays a role in creating an optimal proofing environment, helping you maintain the ideal humidity levels more reliably. Additionally, monitoring humidity levels with a hygrometer can provide more precise control. By fine-tuning humidity, you create a stable environment that encourages proper fermentation, ensuring your dough develops the right elasticity and proofing results every time.
Troubleshooting Common Proofing Problems and How to Fix Them

When proofing documents, it’s common to encounter issues that can disrupt your workflow or lead to errors in the final product. One common problem is misjudging proofing times, which can reinforce proofing myths rather than improve your bread texture. If dough overproofs, it may collapse or become overly airy; underproofing results in dense bread. Temperature fluctuations can also cause inconsistent results. To troubleshoot:
- Check proofing times against recommended guidelines rather than myths or assumptions.
- Maintain consistent temperature and humidity levels to prevent uneven proofing.
- Observe dough behavior carefully—signs like bubbles or a slight bounce indicate proper proofing, not just time.
Addressing these issues ensures your proofing process supports ideal bread texture and avoids common pitfalls.
DIY vs. Commercial Proofing Boxes: Which Is Right for You?

When choosing between DIY and commercial proofing boxes, you need to think about your budget, available space, and how much control you want over the environment. DIY options can save you money but might lack precision, while commercial boxes often offer better consistency at a higher cost. Think about what matters most to your baking routine to find the best fit.
Cost Considerations
Deciding between a DIY proofing box and a commercial model often hinges on your budget and long-term goals. If you’re aiming for cost-effective solutions, a DIY setup can be highly budget friendly, allowing you to create a proofing environment without breaking the bank. Commercial proofing boxes tend to come with a higher initial investment but may offer more consistent performance and durability. To make an informed choice, consider:
- Upfront costs versus long-term savings
- Potential need for repairs or replacements
- Your skill level and willingness to build or maintain the setup
A well-chosen option balances affordability with functionality, helping you achieve professional results without overspending. Whether DIY or commercial, prioritize setups that fit your financial plan and baking aspirations.
Space and Size
Choosing the right proofing setup often depends on the space you have available and the size of the batches you plan to proof. If you have limited space, a small DIY proofing box made from simple container materials like plastic or wood can work well. These setups still allow for effective temperature regulation, which is *essential* for consistent proofing results. Larger commercial proofing boxes provide more room for bigger batches and often feature built-in temperature controls, ensuring stable conditions. Consider how much space you can dedicate and whether you need flexibility for small or large quantities. Remember, the container materials you choose impact how well you can maintain consistent temperature regulation, influencing your proofing success.
Precision and Control
While DIY proofing boxes can offer decent temperature control, they often lack the precise consistency that commercial units provide. Commercial proofing boxes excel in proofing accuracy and environmental stability, ensuring your dough proof at a reliable, steady temperature and humidity. This consistency is vital for predictable results and optimal fermentation. DIY setups may struggle with maintaining uniform conditions, leading to uneven proofing. To improve your control, consider factors like:
- Precise temperature regulation devices
- Consistent humidity sources
- Insulation quality for environmental stability
Investing in a commercial proofing box can save you time and effort, delivering consistent proofing conditions and better results. However, with careful adjustments, DIY solutions can sometimes approach this level of control, depending on your skill and equipment.
Frequently Asked Questions
How Do I Measure Ideal Proofing Temperature and Humidity Levels Accurately?
To measure your proofing environment accurately, use a digital thermometer with a built-in humidity gauge. Calibrate your thermometer regularly to guarantee precise temperature readings. Place the device in your proofing area, avoiding drafts and direct contact with walls or shelves. Maintain ideal proofing conditions by aiming for about 75°F (24°C) and 75% humidity. Regular calibration and careful placement help you monitor and control your proofing temperature and humidity levels effectively.
What Are the Best Alternative Household Items for Proofing Equipment?
Think outside the box and use household items like a bread basket lined with a damp towel for proofing. The damp towel creates a humid environment, mimicking professional proofing boxes. Cover your dough with the towel inside the basket, then place it in a warm spot. This simple setup keeps your bread moist and dough happy, proving that sometimes, the best tools are right under your nose.
How Long Should I Proof Different Types of Dough for Optimal Results?
For ideal results, proof different dough types based on fermentation timing and dough texture. For bread dough, aim for 1-2 hours at room temperature or until it doubles in size. For pizza or flatbreads, proof for 30-60 minutes until the dough feels puffy and soft. Adjust proofing times if your dough’s texture isn’t quite right—slightly sticky or airy—so it develops the perfect rise and flavor.
Can I Proof Multiple Batches Simultaneously Without Affecting Quality?
Don’t put all your eggs in one basket—this applies to batch proofing too. You can proof multiple batches simultaneously if your space allows good airflow and consistent temperature. Just guarantee each batch has enough room to expand without touching, and monitor temperature and humidity. This way, you won’t compromise quality, and your doughs will proof evenly, giving you perfect results every time.
How Often Should I Sanitize or Replace DIY Proofing Setups?
You should sanitize or replace your DIY proofing setup every few uses, especially if you’re working with dough fermentation and yeast activation frequently. Regular cleaning prevents bacteria buildup and guarantees consistent results. If you notice mold, bad odors, or uneven proofing, it’s time to sanitize or replace parts. Proper maintenance keeps your proofing environment ideal, supporting healthy yeast activation and perfect dough fermentation every time.
Conclusion
Now that you know the secrets behind professional proofing setups, you’re ready to bring bakery-quality bread home. With a little DIY ingenuity, you can craft a warm, humid environment that transforms your dough into perfection. Think of your kitchen as a blank canvas—your proofing environment is the brush. Master it, and every loaf will tell a story of skill and care, proving that greatness isn’t just in the oven but in the setup that gets you there.