
TL;DR
Acoustic dampening isn’t just about foam — placement, barriers, and ventilation matter most. Moving your rig into a closet or another room can drastically cut noise and reflections, giving you a quiet setup without expensive soundproofing.
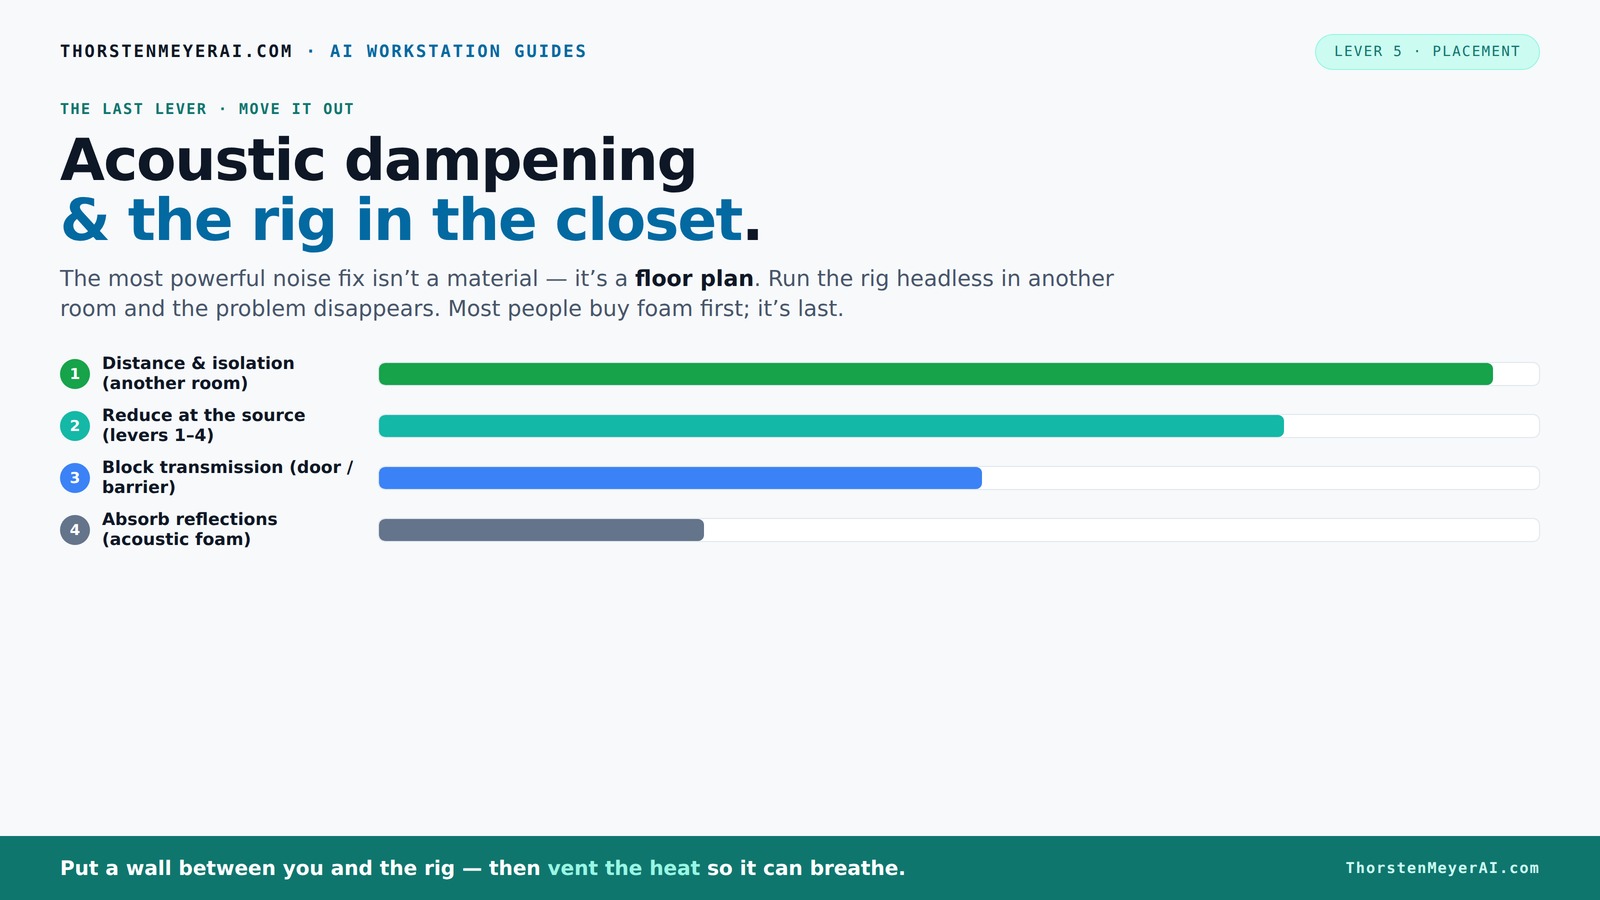
Acoustic dampening
& the rig in the closet.
The most powerful noise fix isn’t a material — it’s a floor plan. A rig you can’t hear because it’s in another room beats any amount of foam. Tap the approaches in Part 1 to see what actually works.
(another room)
(levers 1–4)
(door / barrier)
(acoustic foam)
Contain the noise, not the heat
Key Takeaways
- Prioritize distance and isolation for the biggest noise reduction—moving your rig into another room can save hours of tuning.
- Treat reflection points with panels or blankets first—these have more impact on sound quality than just adding foam everywhere.
- Seal gaps around doors, vents, and any openings—sound leaks often come from these overlooked spots.
- Manage heat with proper ventilation—an exhaust fan or ducted airflow prevents overheating in closet setups.
- Don’t over-treat low frequencies—use bass traps sparingly to avoid deadening your sound in small spaces.

54 Pack Sound Proof Foam Panels |12"×12"×1" Quick-Recovery Soundproof Wall Panels | High Density Sound Dampening Panels for Home Studio |With Adhesive Stickers 270PCS
- Superior Acoustic Treatment: Reduces echoes for clearer sound
- Versatile Wedge Design: Flexible arrangements for different rooms
- Easy Installation: Includes adhesive pads for quick setup
As an affiliate, we earn on qualifying purchases.
As an affiliate, we earn on qualifying purchases.
Why Acoustic Treatment Is Just One Piece of the Puzzle
Acoustic dampening and soundproofing serve different purposes. Foam, blankets, and panels mainly soften echoes inside the space. But if you want silence outside, sealing gaps and adding mass are what really block sound from escaping or coming in. For a closet rig, focusing on reflection points — like the wall behind your mic — can cut the boxy, boomy sound more effectively than layers of foam alone.
Imagine a tiny room with parallel walls. Without treatment, it’s like shouting in a canyon. Add some foam, and echo reduces. Seal gaps around the door, and sound leaks decrease. The key: treat the reflections first, then block sound transmission. This layered approach makes a noticeable difference.
Understanding this distinction helps you prioritize your efforts. Over-investing in foam without sealing gaps can lead to only marginal improvements, while neglecting reflection points can leave your recordings muddy and echoey. Balancing absorption with isolation creates a more controlled environment that enhances clarity and reduces fatigue during long sessions.
Best Mic Placement in a Closet: How to Avoid That Echo-Box Sound
The most effective trick for a tiny closet: position your mic and speakers before adding any treatment. Place the mic about 6-12 inches from your mouth, angled slightly to avoid direct reflections. Try to keep the mic away from the back wall, especially if it’s a flat, hard surface. For reflection points, place panels at 45-degree angles where sound bounces off the walls and ceiling.
Why does this matter? Proper placement minimizes the chance of capturing unwanted reflections that cause a 'boxy' or 'echoey' sound. When your mic is too close to walls or directly facing reflective surfaces, it picks up more of these problematic echoes, reducing clarity. Positioning it correctly allows your natural voice to shine through and makes treatment more more effective.
For example, if you’re recording vocals, set your mic in the corner farthest from the door, facing inward. Then, treat that wall behind it and the reflection points on the ceiling and side walls. This strategic positioning reduces flutter echoes and makes your recordings sound clearer, less “boxy.”
Remember: small adjustments in placement can significantly improve your sound, saving you time and effort in treatment and editing.
Where to Put Foam, Panels, and Blankets for Maximum Effect
In a closet, treat the surfaces most likely to cause echo and flutter: the back wall, side walls, and ceiling. Place 2-4 inch thick panels at reflection points — like the wall behind the mic — and add broad absorption on the ceiling. Blankets and rugs can help dampen the floor and door area. For more tips on acoustic treatment, see this guide.
Why is this important? Proper placement of absorption materials ensures that sound reflections are absorbed where they originate, rather than bouncing around and creating a muddy, indistinct sound. Strategically positioned panels reduce flutter echoes and improve clarity, especially when recordings are intended for professional use or streaming. Over-treating or random placement can cause unnatural deadness, so focus on key reflection points for a balanced sound.
For instance, a thick blanket over the door frame reduces sound leaks and reflections. Foam panels on the side walls at ear level help control mid-range echoes. Use corner bass traps if your recordings sound boomy at low frequencies, but don’t overdo it — small closets rarely need heavy bass treatment.
The tradeoff: too much absorption can make your room sound flat or unnatural. The goal is a balanced environment where reflections are controlled but the sound still feels natural and lively.
Sealing the Door and Managing Sound Leaks Effectively
The door is often the biggest leakage point. Weatherstripping around the frame, a draft stopper, or a blanket taped over it can block sound from escaping. If possible, add a thick curtain or foam panel over the door to further reduce reflections and leaks.
Why does this matter? Gaps around the door can let in or out significant amounts of sound, undermining your entire setup. Proper sealing ensures that your efforts in treatment aren’t wasted on leaks, and it keeps external noise from contaminating your recordings. It also helps maintain a consistent acoustic environment, which is crucial for voice work or sensitive AI tasks. Learn more about effective sealing techniques at this resource.
Imagine recording vocals in a closet with a plain door. Sealing gaps with weatherstripping and hanging a blanket can cut noise by half or more, turning a noisy closet into a quiet sanctuary. Remember: even small gaps can let in or out a surprising amount of sound. The tradeoff: sealing can be time-consuming but yields a much cleaner sound environment, especially in small, untreated spaces.
Managing Low-End Buildup in Tiny Closets Without Overdoing It
Low-frequency boominess is common in small spaces because parallel walls reflect bass sounds, creating resonances that muddy recordings. To counter this, add bass traps in corners or use broad broadband panels on walls. For more on managing low-end issues, see this guide.
Why does this matter? Excessive low-frequency treatment can lead to an overly dead room, where every sound feels muffled or unnatural, affecting the accuracy of your recordings. Properly balancing bass absorption allows you to control boominess while maintaining a natural sound. For example, placing bass traps in corners where two walls meet helps absorb resonant frequencies without over-dampening the entire space.
In practice, focus on treating only if you notice significant low-end buildup. Use broad broadband panels or even soft furnishings like rugs and blankets to absorb mid and low frequencies evenly. The tradeoff: over-treating can strip your recordings of warmth and character, so aim for a balanced approach that preserves the natural sound of your voice or instruments.
The "Rig in the Closet" Setup: Ventilation and Heat Management
The biggest challenge with a closet rig? Heat. A sealed space traps warmth, and a GPU or high-end CPU can generate 600W+ of heat, turning your closet into a mini sauna. To keep everything cool, add active ventilation — like a quiet exhaust fan — or use ducted airflow systems.
Why is this important? Excess heat not only risks damaging your equipment but can also cause thermal throttling, reducing performance and lifespan. Proper ventilation ensures your rig runs efficiently and safely, especially during long sessions or intensive AI processing. For small spaces, choosing quiet fans and ducting systems minimizes noise pollution while maintaining airflow. For example, a small duct with a low-noise exhaust fan can effectively remove hot air without adding unwanted background noise. Larger setups may require more sophisticated solutions, like thermostatic fans and soundproof ducting, which balance cooling needs with noise control. Check out this guide on cooling for detailed tips.
Tradeoff: insufficient cooling can lead to overheating and hardware failure, while aggressive cooling methods might introduce noise or require complex installation. The goal is a balanced, efficient airflow that maintains safe temperatures without compromising your quiet environment.
Choosing the Right Materials for DIY Closet Rigs
For budget-friendly setups, use thick blankets, moving pads, or old comforters over the door and walls. Stack foam panels on reflection points and add rugs or carpets on the floor. If you want a more refined setup, consider specialty acoustic panels and soundproofing materials, but DIY solutions can be surprisingly effective.
Why does this matter? Using readily available materials allows you to create a functional acoustic environment without significant investment. Properly placed DIY materials can absorb enough reflections and reduce noise leaks to produce professional-sounding recordings. It’s about smart placement and layering, not necessarily expensive gear. For example, a $50 set of foam panels combined with blankets can significantly improve your room’s acoustics if placed correctly. Remember, the key is strategic positioning—cover reflection points and gaps—rather than just piling on materials. This approach offers flexibility and cost-effectiveness, enabling you to tailor your setup as your needs evolve.
Common Mistakes to Avoid When Setting Up Your Closet Rig
Avoid treating every surface indiscriminately — focus on reflection points first. Don’t forget to seal gaps and treat the door. Relying solely on foam for soundproofing is a mistake; it only reduces echo, not block sound. Over-treating low frequencies with bass traps in tiny rooms can deaden your sound unnaturally.
Why is this important? Over-treating or misplacing materials can lead to unnatural sound qualities, reducing the natural warmth and liveliness of your recordings. Excessive foam everywhere can create a muffled, lifeless environment, defeating the purpose of a natural-sounding space. Conversely, neglecting sealing gaps and reflection points results in persistent noise leaks and echo issues. The key is strategic, targeted treatment—prioritizing reflection points, sealing gaps, and managing low frequencies judiciously. This balanced approach ensures your space sounds clear, natural, and professional without unnecessary clutter or deadness.
Remember: effective treatment isn’t about covering every surface but about understanding the acoustic behavior of your space and addressing the most impactful areas first. This saves time, money, and effort while achieving optimal sound quality.