
Install and set up a smart thermostat to control your home’s heating or cooling, connect it to Wi-Fi, and create a schedule. This guide is for homeowners or authorized occupants who can safely switch off HVAC power and identify basic thermostat wiring. Allow 45–90 minutes; compatibility checks and wiring are the parts that need the most care.

Get home appliances delivered free with Prime
- Fast, free delivery on millions of items
- Prime Video, Amazon Music and more included
- Member-only deals all year

Google Nest Thermostat – Smart Wi‑Fi Thermostat for Home
- ✔ Connectivity: Wi-Fi
- ✔ Temperature control: Heating and cooling
- ✔ Power: Battery powered

Sensi Smart Thermostat (ST55) – Wi‑Fi, DIY Installation, Alexa Compatible, Energy Star Certified
- ✔ Connectivity: Wi-Fi
- ✔ Power: 24 V AC corded electric
- ✔ Display: LED, 5-inch screen
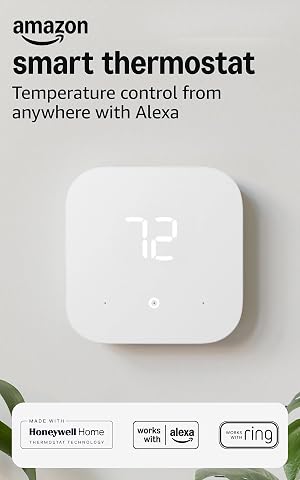
Amazon Smart Thermostat – Save Money and Energy, Works with Alexa and Ring (C-wire Required)
- ✔ HVAC compatibility: Most 24V systems, including conventional forced air, heat pump, and radiant boiler
- ✔ Power: C-wire required or optional power adapter kit
- ✔ Network: 2.4 GHz Wi-Fi, 802.11 b/g/n
Difficulty: Intermediate | Time: 45–90 minutes
What You’ll Need
Tools & Materials:
- Smart thermostat and its installation instructions
- Small screwdriver
- Phone or tablet with the thermostat maker’s app installed
- Home Wi-Fi name and password
- Labels or masking tape and a pen
- Camera for recording existing wiring
- Voltage tester, if you know how to use one
Knowledge:
- Basic ability to turn off a circuit breaker
- Ability to identify the HVAC equipment controlled by the thermostat
- Ability to follow the manufacturer’s wiring diagram
Check compatibility before buying or installing the thermostat. Use the manufacturer’s compatibility checker with your system type and the labels on the existing thermostat wires. If you rent, get the owner’s approval before changing equipment. Stop and contact an HVAC technician if your system type is unsupported, wiring is unclear, or you find damaged or unfamiliar connections.
Google Nest Thermostat – Smart Wi‑Fi Thermostat for Home
The Google Nest Thermostat earns the top spot by combining remote heating and cooling control with energy-saving suggestions and HVAC monitoring alerts. Its most useful practical distinction is power flexibility: it can work without a C-wire in many homes, giving it an advantage over the Amazon model, which specifies a C-wire or adapter. That can make Nest the more approachable upgrade when existing wiring is uncertain, though buyers still need to check system compatibility rather than assume every installation will be wire-free.Schedules, app access, and voice control cover the daily jobs most households expect from a smart thermostat. The DIY setup is designed to take about 30 minutes, which keeps the installation proposition simple compared with systems that require more preparation. Nest is especially compelling for people already using Google Home, but the listed compatibility also includes Alexa and mobile platforms. That breadth makes it less locked to one control method than the Amazon thermostat, although connected features still depend on reliable Wi-Fi and compatible devices.There are meaningful limits. Heating-only or zone-controlled systems may need a C-wire or power accessory, and the battery-powered design means periodic battery replacement can be part of ownership. Its LCD is also compact, so people who expect a large, information-rich display may prefer a model with a bigger screen. We place Nest first because its mix of energy tools, alerts, and flexible power requirements is the most broadly useful here; Sensi remains a stronger choice for households prioritizing HomeKit and other platform options.
Pros:
- May operate without a C-wire in many homes
- Provides remote control through the Google Home app
- Offers energy-saving suggestions and HVAC monitoring alerts
- Supports major voice assistants and programmable schedules
Cons:
- Some system types still need a C-wire or power accessory
- Connected functionality depends on stable Wi-Fi
- Battery-powered operation can require periodic battery replacement
Best for: Households seeking app-based heating and cooling control, energy suggestions, and a thermostat that may work without a C-wire.
Not ideal for: Homes with heating-only or zone-controlled HVAC that require additional wiring support, or buyers who want a large display and minimal reliance on connected services.
Bottom line: Nest is our best overall pick for balanced smart control and installation flexibility, provided the home’s HVAC setup is compatible.
“Nest is our best overall pick for balanced smart control and installation flexibility, provided the home’s HVAC setup is compatible.”
Sensi Smart Thermostat (ST55) – Wi‑Fi, DIY Installation, Alexa Compatible, Energy Star Certified
For households mixing smart home systems, the Sensi ST55 stands apart from the more ecosystem-centered Nest and Amazon models. It supports Alexa, Google Assistant, Apple HomeKit, SmartThings, and Vera, so we can choose controls that fit the devices already in our home. That flexibility is its defining advantage: buyers do not need to make Alexa or Google the center of the thermostat decision. It also includes flexible scheduling, usage reports, remote monitoring, and a filter-change indicator, giving owners several ways to manage routine HVAC care.Installation guidance is another point in Sensi’s favor. The built-in level and step-by-step app instructions are designed to make DIY setup less error-prone, while the 5-inch display offers more screen area than Nest’s listed 1.07-inch screen. That can make on-device interaction more comfortable for people who regularly adjust settings at the wall. Sensi also emphasizes data privacy, which may matter to buyers who want app-connected control but care about how household data is handled.The tradeoff is power compatibility: some systems require a C-wire, so Sensi is not automatically the easier installation compared with Nest. Its energy-saving claim of up to 23% reduction in HVAC usage is a stated potential, not a result every home should expect; schedules, climate, and system efficiency affect outcomes. We rank it second because its platform breadth and setup aids are unusually useful, though buyers prioritizing a possible C-wire-free installation may prefer Nest. Alexa-first households with a compatible C-wire may find Amazon’s routine integration more direct.
Pros:
- Supports Alexa, Google Assistant, Apple HomeKit, SmartThings, and Vera
- Built-in level and app guidance support DIY installation
- Includes scheduling, usage reports, and remote monitoring
- Adds a filter-change indicator and stated data privacy protections
Cons:
- May require a C-wire depending on HVAC setup
- Energy reduction claims are not guaranteed for every home
- Wi-Fi and app access are needed for connected controls
Best for: Buyers with a mixed smart home who want guided DIY installation, usage reporting, and broad assistant compatibility.
Not ideal for: Homes where C-wire availability is uncertain and buyers who want the simplest possible wiring path without checking system requirements first.
Bottom line: Sensi is the best fit for platform flexibility and guided setup, as long as the home’s wiring checks out.
“Sensi is the best fit for platform flexibility and guided setup, as long as the home’s wiring checks out.”
Amazon Smart Thermostat – Save Money and Energy, Works with Alexa and Ring (C-wire Required)
The Amazon Smart Thermostat makes the most sense when Alexa already handles routines and connected devices around the home. It can use schedules, vacation mode, humidity sensing, and temperature or presence-based adjustments to automate comfort through the Alexa app. That focus gives it a clearer role than Nest or Sensi: it is the lineup’s dedicated Alexa option, designed to sit naturally alongside compatible Alexa devices and Ring. Buyers who want one ecosystem to coordinate these controls may find that useful.Its main compromise appears before setup begins. Amazon requires a C-wire or optional power adapter, while Nest can work without a C-wire in many homes and Sensi’s requirement varies by system. The Amazon thermostat also needs an Alexa-enabled device for voice commands because it has no far-field microphone. It offers app and touch-button controls, but it does not act as a standalone voice assistant. These requirements make it a less forgiving choice for uncertain wiring or households that expect voice control directly from the thermostat.Network support is another constraint: this model operates on 2.4 GHz Wi-Fi and does not support 5 GHz networks. Its guided installation through the Alexa app is helpful, and ENERGY STAR certification is a useful credential, but the stated annual savings estimate should not be treated as a promise. We rank it third because its strong Alexa integration serves a specific audience well while its power and network requirements narrow fit more than the other two picks. Sensi is the more versatile alternative for multi-platform homes; Nest is the better starting point when wiring flexibility matters.
Pros:
- Integrates with Alexa routines, app controls, and compatible Ring features
- Includes schedules, vacation mode, and humidity sensing
- Supports guided installation through the Alexa app
- ENERGY STAR and ECOLOGO Gold certified
Cons:
- Requires a C-wire or separate power adapter
- Voice commands require a separate Alexa-enabled device
- Supports 2.4 GHz Wi-Fi only
Best for: Alexa-focused households with a compatible 24V HVAC system, a C-wire or adapter, and a 2.4 GHz Wi-Fi network.
Not ideal for: Homes without suitable C-wire power, users on 5 GHz-only Wi-Fi, or buyers seeking built-in voice control from the thermostat itself.
Bottom line: Choose Amazon for Alexa-centered automation when wiring and Wi-Fi requirements are already satisfied.
“Choose Amazon for Alexa-centered automation when wiring and Wi-Fi requirements are already satisfied.”
As an Amazon Associate we earn from qualifying purchases.
Before You Start
Smart thermostats do not all support the same systems. Compatibility can depend on whether you have a heat pump, conventional furnace, boiler, multi-stage equipment, or a line-voltage system. Follow the instructions for your exact thermostat model; wire labels and terminal names vary. Never rely on wire color alone.
Turn off HVAC power at the breaker before touching wires. If you cannot identify the correct breaker or confirm the system is off, do not proceed. Keep the old thermostat available until the new one is working.
Step-by-Step Instructions
Step 1: Check system compatibility
Confirm that the thermostat supports your heating and cooling equipment by using the manufacturer’s compatibility checker or installation guide. Identify your system type from its documentation or equipment labels. Compare the existing thermostat’s terminal labels with the new thermostat’s wiring guide, and check whether the new model needs a C wire or a compatible power adapter.
Tip:A thermostat designed for low-voltage HVAC wiring may not support electric baseboard or other line-voltage systems. Do not connect it unless the model explicitly supports that equipment.
Check: The model’s documentation lists your system type as supported and explains how to handle its wiring and power requirements.
Step 2: Record the current wiring
Keep the existing thermostat mounted while recording its wiring. Remove the cover, take a clear photo showing every wire and terminal label, and write down which wire connects to each terminal. Label each wire by its terminal name before disconnecting anything. If a wire has no readable label or the arrangement does not match the new thermostat’s diagram, stop and ask a qualified technician.
Tip:Photograph the terminal letters as well as the wire positions. Wire color can be inconsistent, so do not use color as the only record.
Check: You have a readable photo and a written terminal-to-wire list that you can refer to during installation.
Step 3: Turn off HVAC power
Set the old thermostat to off, then switch off the HVAC system at its circuit breaker. If the indoor and outdoor units use separate breakers, switch off both as directed in the equipment instructions. Return to the thermostat and check that the display goes dark or that the system does not respond. Use a voltage tester only if you know how to use it safely.
Tip:Do not touch bare wire ends while power may be present. If the display stays on, identify the correct breaker before continuing.
Check: The thermostat is no longer powered, and you have confirmed that the HVAC equipment is off.
Step 4: Remove the old thermostat
Remove the thermostat cover and loosen the terminal screws. Disconnect one wire at a time, keeping each label attached. Hold the wires or secure them gently with tape so they do not slip back into the wall. Remove the old mounting plate only after all wires are free, then guide the wires through the opening.
Tip:Keep the old thermostat and its plate until the new installation is complete. They can help you compare connections if you need to troubleshoot.
Check: The old thermostat is removed, and every wire remains visible, labeled, and accessible.
Step 5: Mount the new thermostat base
Feed the wires through the new base plate and position it over the wall opening. Level the plate if a level is supplied or recommended. Mark the mounting holes, install the included anchors when needed, and fasten the base without overtightening. Check that no wire is pinched behind the plate.
Tip:If the new plate does not cover the old paint outline or screw holes, fit the manufacturer’s trim plate before securing the base.
Check: The base sits flat and secure, with the wires accessible through its opening.
Step 6: Connect the wires
Connect each labeled wire to the terminal specified by the new thermostat’s wiring diagram. Insert only the required amount of exposed conductor and tighten each terminal as instructed. If the thermostat requires a C wire, connect it only where the system and model instructions specify, or install the approved adapter using its diagram. Do not guess, bridge terminals, or connect unused wires unless the instructions direct you to.
Tip:Common labels include R, C, W, Y, and G, but heat pumps and other systems may use additional or different terminals. The model’s wiring diagram takes priority over a generic chart.
Check: Each connected wire is secure and matches both your recorded terminal list and the thermostat’s model-specific diagram.
Step 7: Attach the thermostat and restore power
Check that no bare wire can touch another terminal, then attach the thermostat display to its base. Restore power at the breaker. Wait for the thermostat to start and follow any on-screen equipment setup prompts. If you see an error, smell burning, hear unusual equipment noises, or the breaker trips, turn power off and contact a qualified technician.
Tip:Some thermostats take several minutes to start or update. Keep the installation guide nearby while the setup screen loads.
Check: The display starts without an error, and the breaker remains on.
Step 8: Configure equipment and Wi-Fi
Select the correct system type and equipment stages in the thermostat setup menu or companion app, using your HVAC documentation. Set the temperature units and preferred heating and cooling limits. Connect the thermostat to your home Wi-Fi using the network name and password, then complete any account or firmware setup requested by the app.
Tip:If the app asks about a heat pump, reversing valve, or auxiliary heat, use your equipment documentation or installer’s settings. An incorrect selection can make heating and cooling behave incorrectly.
Check: The thermostat appears online in the app, shows the correct room temperature, and displays the equipment type you selected.
Step 9: Test heating and cooling
Run the thermostat’s test mode if available. Otherwise, select heat and raise the set point a few degrees above the room temperature. Wait for the system’s normal startup delay and confirm that warm air or heat begins. Switch to cooling, lower the set point a few degrees below room temperature, and check for cool air after the system’s delay. Return the mode to the setting you want when testing is complete.
Tip:Many systems delay startup to protect equipment. Do not repeatedly switch modes or rapidly change the set point while waiting.
Check: Each supported mode starts the expected equipment and produces the expected heating or cooling. If the system does not support one of the modes, follow its equipment documentation.
Step 10: Create a schedule and verify remote control
Choose a schedule that fits your routine in the app or thermostat menu. Set the times and temperatures for periods such as home, away, and sleep, and check that the schedule applies to the correct days. Use the app to make a small temporary temperature change, then confirm that the thermostat display updates. Save the schedule and check the next scheduled change time.
Tip:Start with a simple schedule. You can refine it after observing how quickly your home warms or cools and how the schedule fits your day.
Check: The schedule appears on the thermostat or in the app, the temporary app change reaches the thermostat, and the next scheduled period is shown correctly.
Common Mistakes to Avoid
- Choosing a thermostat that does not support the HVAC system. — Check the model’s compatibility information against the equipment type and terminal labels before installation.
- Connecting wires by color instead of terminal label. — Label each wire by the old terminal and follow the new model’s wiring diagram.
- Leaving HVAC power on while handling wires. — Switch off the appropriate breaker and confirm the thermostat is unpowered before disconnecting wires.
- Selecting the wrong equipment or heat-pump settings during setup. — Use the HVAC documentation and thermostat-specific setup instructions; do not guess when a setting is unclear.
Troubleshooting
Problem: The thermostat does not power on after installation.
Solution: Turn off HVAC power. Check that the display is seated on its base, wires are fully inserted in the correct terminals, and the required C wire or approved adapter is connected as directed. Restore power. If it remains blank, consult the model’s troubleshooting guide or an HVAC technician.
Problem: The app cannot find or connect to the thermostat.
Solution: Confirm that the thermostat is powered and in Wi-Fi setup mode. Check the network name and password, and follow the model’s guidance on supported Wi-Fi bands and network settings. Restart setup in the app if needed.
Problem: Heating runs when cooling is selected, or the reverse.
Solution: Turn the system off and compare the wiring and equipment selections with the thermostat’s heat-pump or conventional-system diagram. Check any reversing-valve setting against the equipment documentation. Contact a technician if the correct setting is uncertain.
Problem: The system does not start during a test.
Solution: Wait through the equipment’s normal delay, confirm the thermostat is set to the correct mode, and check that HVAC power is on. Verify the set point is beyond the room temperature in the direction being tested. If the system still does not respond, turn it off and request service.
What Success Looks Like
The thermostat powers on without errors, connects to the app and home Wi-Fi, reports a plausible room temperature, and follows the schedule you set. When tested, each supported heating or cooling mode starts the expected equipment after its normal delay. The breaker stays on, and no unusual noise or error message appears.
Next Steps
Keep the old thermostat, wiring photo, and model instructions until the new unit has worked reliably through both heating and cooling. Review the schedule after a few days and adjust times or set points to fit your routine. Replace or clean the HVAC filter on the schedule recommended for your equipment, and check the thermostat app periodically for alerts or connection problems. Contact an HVAC technician if wiring errors recur, the breaker trips, or the system cannot reach the set temperature.
Frequently Asked Questions
Do I need a C wire for a smart thermostat?
It depends on the thermostat and HVAC system. Check the model’s power requirements and compatibility guide. If a C wire is required but unavailable, use only an adapter approved for that thermostat and system, or ask an HVAC technician to assess the wiring.
Can I install a smart thermostat on a heat pump?
Many models support heat pumps, but support varies by model and system configuration. Confirm compatibility and follow the specific instructions for the reversing valve and auxiliary heat settings.
Can I install one on electric baseboard heat?
Only if the thermostat is explicitly rated for that line-voltage system. Many smart thermostats are designed for low-voltage HVAC equipment and are not compatible with baseboard wiring.
Why does the thermostat wait before starting the system?
A short delay may protect heating or cooling equipment or allow the thermostat to finish setup. Wait for the interval stated in the equipment or thermostat instructions. If the delay continues or an error appears, check the model’s troubleshooting guidance.
Can I use the thermostat without Wi-Fi?
Many models still allow local temperature control without Wi-Fi, but app access, remote control, and some features may not work. Check the model’s instructions for its offline behavior and setup requirements.